
Configure NGINX and Keycloak to enable SSO for proxied applications
The article explains how to configure single sign-on (SSO) for applications proxied behind NGINX. We use OpenID Connect (OIDC) authentication mechanism which is a thin layer that sits on top of OAuth 2.0, with Keycloak as the identity provider (IdP), and OpenResty as the relying entity.
Background
There are many options for authenticating API calls, however, OAuth 2.0 authentication mechanism is the one being majorly used. Here, OAuth 2.0 access tokens are the authentication credentials passed from client to API server and typically carried as an HTTP header.
Keycloak supports OIDC (an extension to OAuth 2.0) and works as an IdP while authenticating a client.
The standard method for validating access tokens with an IdP is called token introspection. Nginx acts as an OAuth 2.0 Relying Party, sending access tokens to the IdP for validation i.e. token introspection, and only proxying requests that pass the validation process.

Nginx performing token validation as a reverse proxy.
Why perform token validation at Nginx?
Performing validation at each backend service or application results in a lot of duplicate code and unnecessary processing. Various error conditions and edge cases need to be accounted for, and doing so in each backend service is a recipe for inconsistency in implementation and consequently an unpredictable user experience.
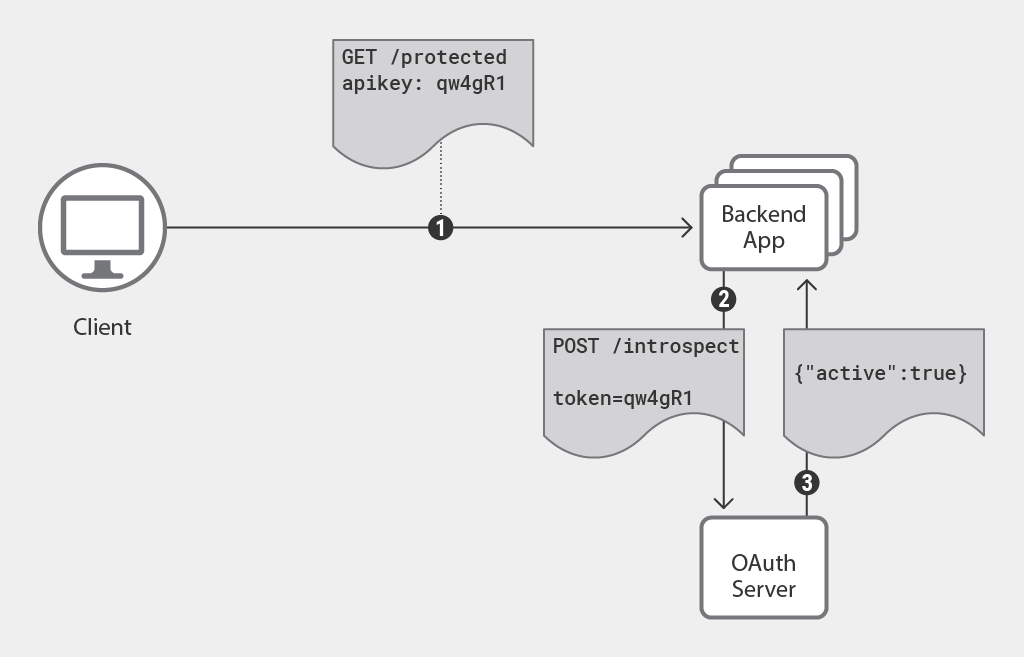
Backend applications performing token validation.
To avoid code duplication and the resulting problems, we can use Nginx to validate access tokens on behalf of backend services.
Custom NGINX
To integrate Nginx with Keycloak, we need Lua dependency. Instead of adding dependencies to Nginx, we use Openresty which is a web server built on top of Nginx.
Below is the Dockerfile used to build Nginx image required.
FROM openresty/openresty:alpine-fat

RUN mkdir /var/log/nginx

RUN apk add --no-cache openssl-dev
RUN apk add --no-cache git
RUN apk add --no-cache gcc
RUN luarocks install lua-resty-openidc

ENTRYPOINT ["/usr/local/openresty/nginx/sbin/nginx", "-g", "daemon off;"]
EXPOSE 80
In the nginx.conf configuration file below, we protect two backend applications.
upstream app_a {
    server app_1:80;
}

upstream app_b {
    server app_2:80;
}

server {
       listen   3002;
       root     /opt/nginx/html;
       resolver 127.0.0.11  valid=1s    ipv6=off;

       access_by_lua '
         local opts = {
           redirect_uri_path = "/redirect_uri",
           accept_none_alg = true,
           discovery = "http://host.docker.internal:3333/auth/realms/myrealm/.well-known/openid-configuration",
           client_id = "nginx",
           client_secret = "2b1abac6-e3b0-4bec-aae7-0dff3607cf4c",
           redirect_uri_scheme = "http",
           logout_path = "/logout",
           redirect_after_logout_uri = "http://host.docker.internal:3333/auth/realms/myrealm/protocol/openid-connect/logout?redirect_uri=http://localhost/",
           redirect_after_logout_with_id_token_hint = false,
           session_contents = {id_token=true}
         }
         -- call introspect for OAuth 2.0 Bearer Access Token validation
         local res, err = require("resty.openidc").authenticate(opts)
         if err then
           ngx.status = 403
           ngx.say(err)
           ngx.exit(ngx.HTTP_FORBIDDEN)
         end
      ';

      # I disabled caching so the browser won't cache the site.
      expires           0;
      add_header        Cache-Control private;

      location / {
          proxy_pass      http://app_a;
          proxy_set_header    X-Forwarded-For         $remote_addr;
      }

      # redirect server error pages to the static page /40x.html
      #
      error_page 404 /404.html;
          location = /40x.html {
      }

      # redirect server error pages to the static page /50x.html
      #
      error_page 500 502 503 504 /50x.html;
          location = /50x.html {
            root /usr/share/nginx/html;
      }
}

server {
       listen   4090;
       root     /opt/nginx/html;
       resolver 127.0.0.11  valid=1s    ipv6=off;

       access_by_lua '
         local opts = {
           redirect_uri_path = "/redirect_uri",
           accept_none_alg = true,
           discovery = "http://host.docker.internal:3333/auth/realms/myrealm/.well-known/openid-configuration",
           client_id = "nginx2",
           client_secret = "a9d487b6-587d-4577-a47f-7e505cce5dab",
           redirect_uri_scheme = "http",
           logout_path = "/logout",
           redirect_after_logout_uri = "http://host.docker.internal:3333/auth/realms/myrealm/protocol/openid-connect/logout?redirect_uri=http://localhost/",
           redirect_after_logout_with_id_token_hint = false,
           session_contents = {id_token=true}
         }
         -- call introspect for OAuth 2.0 Bearer Access Token validation
         local res, err = require("resty.openidc").authenticate(opts)
         if err then
           ngx.status = 403
           ngx.say(err)
           ngx.exit(ngx.HTTP_FORBIDDEN)
         end
      ';

      # I disabled caching so the browser won't cache the site.
      expires           0;
      add_header        Cache-Control private;

      location / {
          proxy_pass    http://app_b;
          proxy_set_header    X-Forwarded-For         $remote_addr;
      }

      # redirect server error pages to the static page /40x.html
      #
      error_page 404 /404.html;
          location = /40x.html {
      }

      # redirect server error pages to the static page /50x.html
      #
      error_page 500 502 503 504 /50x.html;
          location = /50x.html {
            root /usr/share/nginx/html;
      }
}
Keycloak
On spinning up Docker containers, we can access the Keycloak admin portal at http://localhost:3333. After logging in, we create a new realm myrealm in order to add our clients.
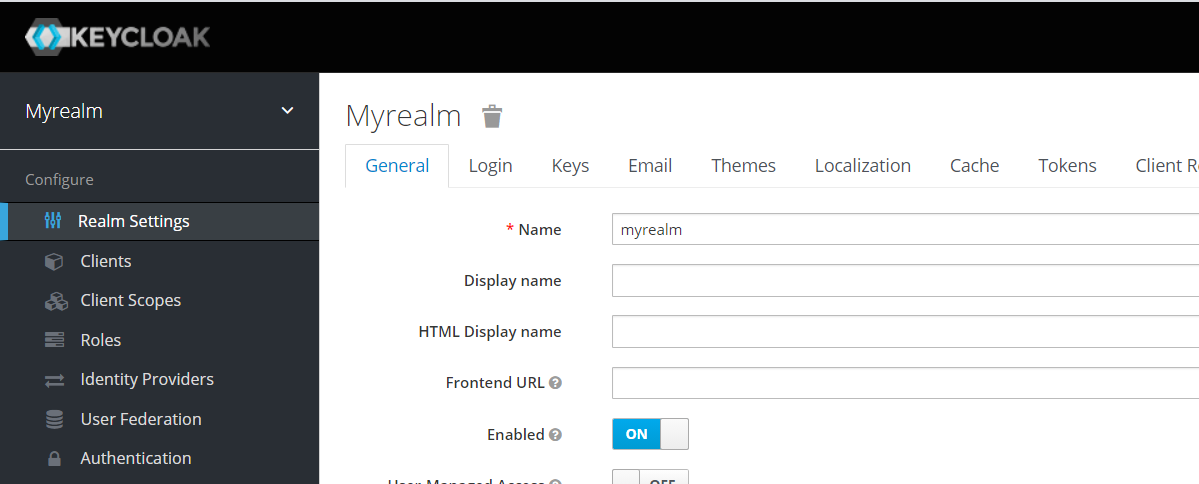
Creating a new realm.
Next, we add new clients, configure settings as per requirement, and add Valid Redirect URIs.
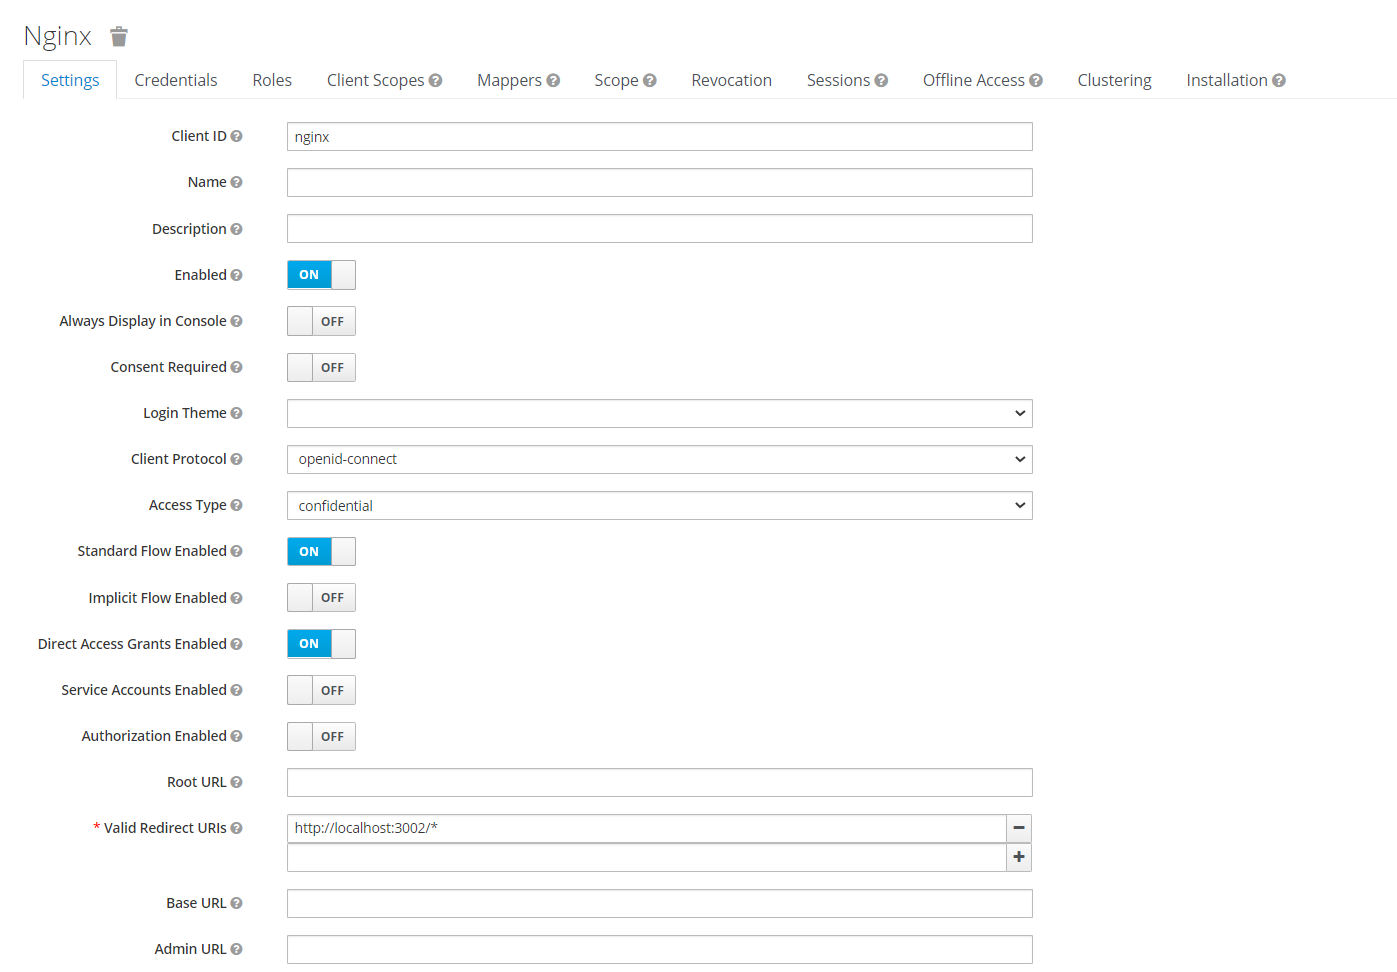
Creating a new client.
Also, we need to add a secret key from the Credentials tab to the Nginx configuration file.
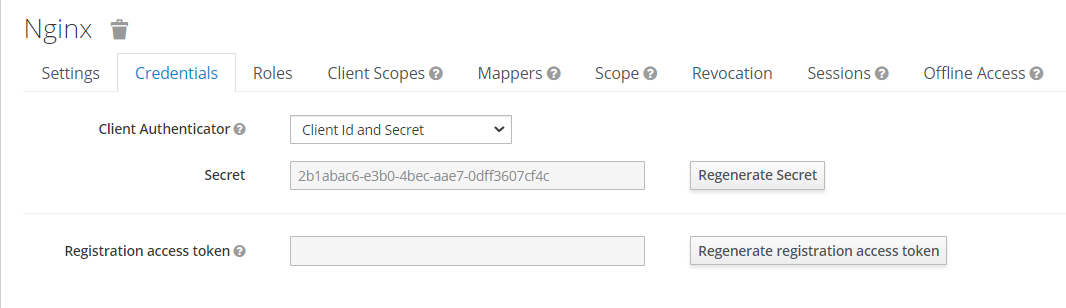
Client secret.
Add user details into Users required for authentication when a user tries to access any application.
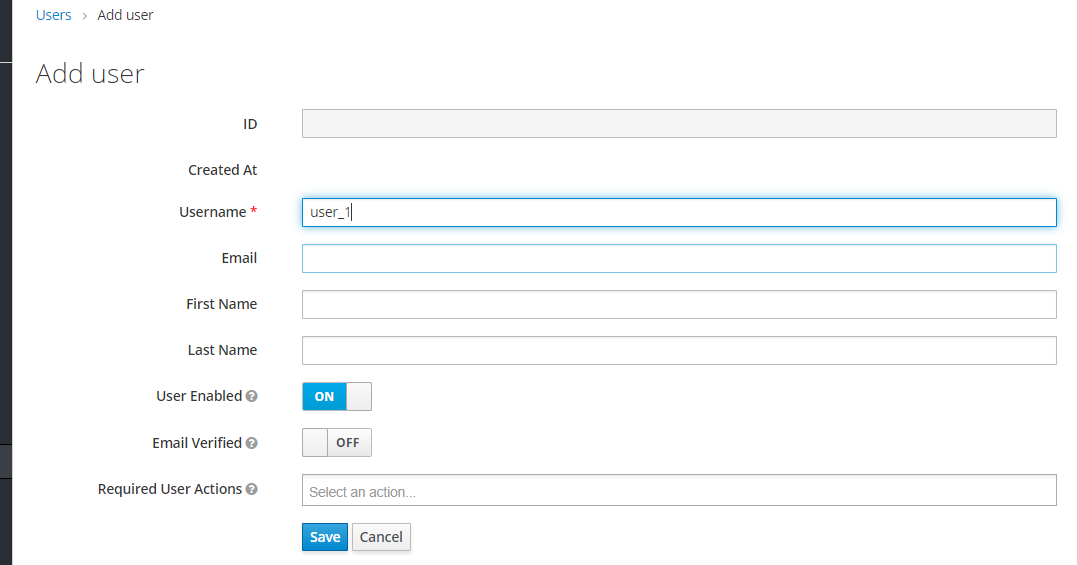
Add user details.
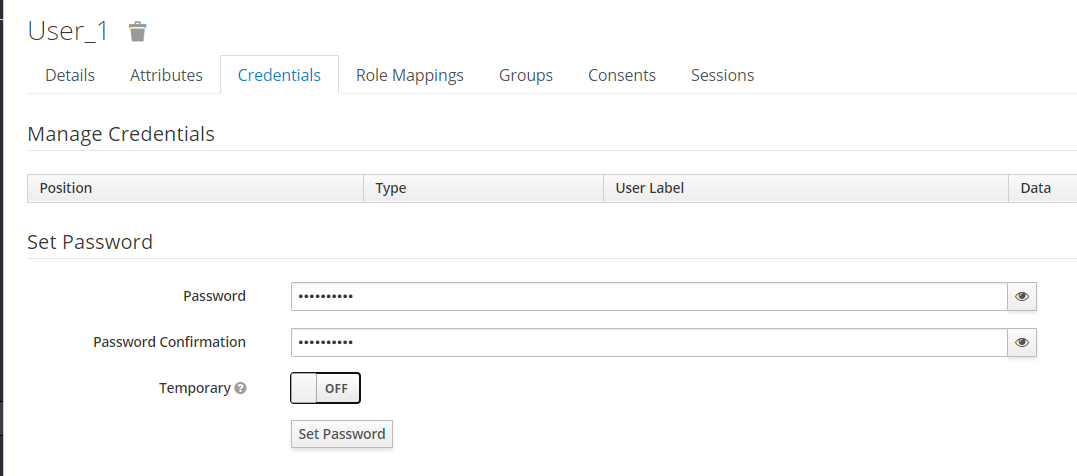
Add user password.
Docker-compose
We use Postgres as the backend database for keycloak to store client settings. Nginx containers are used to represent demo applications, app_1 and app_2.
version: "3"

networks:
    mynetwork:
        name: mynetwork

volumes:
    postgres_data:

services:
    postgres:
        image: postgres
        volumes:
            - postgres_data:/var/lib/postgresql/data
        environment:
            POSTGRES_DB: keycloak
            POSTGRES_USER: keycloak
            POSTGRES_PASSWORD: password
        ports:
            - 5432:5432
        networks:
            - mynetwork
    keycloak:
        image: jboss/keycloak
        environment:
            DB_VENDOR: POSTGRES
            DB_ADDR: postgres
            DB_DATABSE: keycloak
            DB_USER: keycloak
            DB_SCHEMA: public
            DB_PASSWORD: password
            KEYCLOAK_USER: admin
            KEYCLOAK_PASSWORD: password
        ports:
            - 3333:8080
        depends_on:
            - postgres
        networks:
            - mynetwork
    app_1:
        image: nginx
        networks:
            - mynetwork
    app_2:
        image: nginx
        networks:
            - mynetwork
    nginx:
        build:
            context: .nginx/
        ports:
            - 3002:3002
            - 4090:4090
        networks:
            - mynetwork
        volumes:
            - .nginx/nginx.conf:/etc/nginx/conf.d/default.conf
Once everything is up and running, any attempt to access the applications on ports 3002 and 4090 should be protected and the user will be redirected to the login page by Keycloak. On successful login, the user will be able to access the resource requested.